This French Blackout Roman Shade is being assembled using the Rollease Roller Shade Lift System.
For the lift system, I purchased the Rollease Roller Shade "4ft Shade starter kit" because it saves $$ over buying each individual piece on the
Rowley Company website.
Recently, I have become a workroom direct buyer from Rollease, which saves about 20% over buying from Rowley Company.
The Rollease company has a workroom price list that is priced not quite as low as a distributor, but not as high as wholesale. The minimums on the number of items required is less than 10 for larger items (i.e. tubing and clutches) and less than 5 on most smaller items (i.e. tube clips and shade stops).
The
Rollease Roller Shade kit comes with everything you need from Rowley Company.
If you feel uncomfortable with assembling the lift system, Rowley Company also offers an assembled Rollea
se lift system already mounted onto a board with the proper spacing for ANSI Child Cord Safety standards according to the size specifications you provide to them on the order sheet. This system already assembled can be a great way to order the first few times if you are unsure how to assemble the kit yourself. Once you order the system and see the way it is assembled, it is pretty easy to do yourself and saves on the assembly and shipping charges.
Lift system:
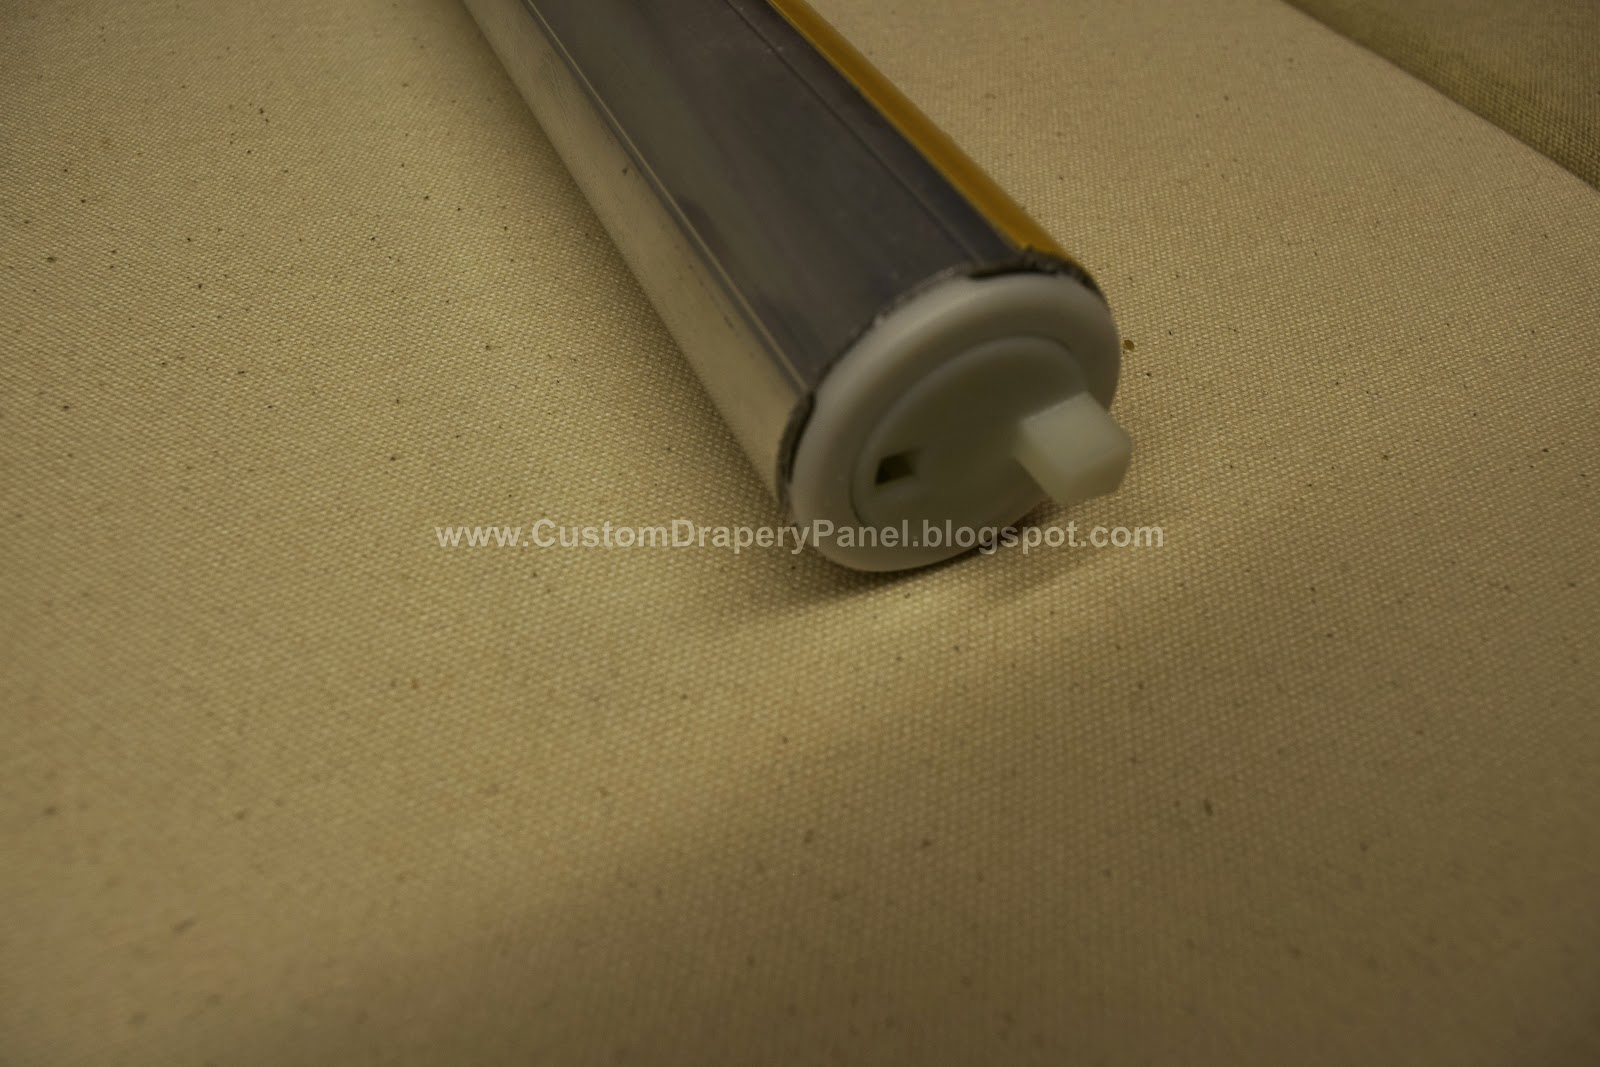
The first step is to cut your roller to the length you need it. For a 48" window opening you will need to cut at least 1 3/8" off the finished length to be able to fit the hardware onto the ends and onto a board. Assemble the Rollease roller shade system by inserting the clutch into the end of the tube as shown.
Insert the plug end into the roller tube as shown. Use a rubber mallet to gently tap the plug into the final resting place in the tube.
Cut your mounting board to 3/8" less than the size of your window opening for an inside mount. Covering your mounting board with a muslin or lining product will give it a finished look.
Use a staple gun with air to save time on fabrication
The board has been stapled with a lining product to give it a finished look
Attach the Rollease Roller shade tube onto the board using the brackets
For a complete guideline on the spacing of cords etc, please refer to the latest ANSI standards for Child Cord Safety. These standards must be followed by each person that manufactures and sells/delivers an assembled shade product that has cords or closed loop cords. These standards can change.
The Rowley Company has a set of recommended instructions for deciding where to put the shade tube clips. The shade tube clips need to be properly placed or the shade will lift unevenly.
Be sure to follow the ANSI child safety standards for cord distance spacing etc.
After completing the assembly of your Rollease Lift system, begin the process of assembling the fabric shade.
 |
| Warning Tags meeting ANSI Standards for Child Cord Safety |
 |
| Close up detail of the Rollease tube clips, shade stop and cord lift |
 |
| The assembled Rollease Roller Shade lift system completely assembled |
Shade assembly
Cut the shade main face fabric:
If the shade has a pattern, you will want to consider the placement of the pattern on the width of the space you are covering with the shade fabric. Sometimes it is necessary to add pieces together to make a pleasing pattern design on the front side of the shade fabric.
For this particular shade, it was cut 16" to 20" longer than the finished length of shade and 8" wider than the finished width of shade and laid flat onto the table to begin the fabrication process. Also on this shade, a piece of fabric will be used on the bottom as a contrasting band. Below is shown the bottom banding already attached and the seam has been steam pressed. (The 16" to 20" includes this bottom banding)
 |
| This is the right side of the fabric laying face down |
The French Blackout Assembly:
Cut each piece of the French Blackout and lay them in the following order:
Immediately following the face fabric, lay the felt or flannel interlining piece (shown here gray felt was used), next the black sateen, next and last the lining product (a cotton sateen or even a thermal dim-out can be used). Each piece is cut to the finished length and width of the shade. I also serge the black sateen and lining product. For the cut size of each piece, the final finished width size of the shade is used and the length of the final shade size plus 4"
The picture below shows the complete French Blackout laying flat on the front side fabric ready to fabricate the shade.
Assembling the shade stabilization system:
Assemble the iron on rib pieces and ribs by cutting the ribs 1" shorter than the finished shade width. Cut the iron on rib inserts the same width as the finished shade. This prevents any dimpling near the iron on ribs when folding the shades sides seams.
 |
| Cut pieces of iron on ribs and shade ribs ready to begin assembly |
 |
| 8" on center of each rib tape row meets ANSI standard spacing for ribs and provides a 4" fold on front of shade |
Please note that 8" spacing of the iron on rib tapes was used on this shade and this spacing allows for less than 6 1/2" length on the shrouded cord. The folds will be 4" on the front of the shade.
To keep the iron on ribs' spacing even all the way across the width of the shade,
continue to follow along with your tape measure ensuring the center to
center spacing as you go.
To ensure a good seal with the iron on tapes, at least a 1400 watt steam iron should be used. Test a spot that can be hidden first or a scrap piece to ensure no browning or burns will occur when you use the "very hot" setting on the iron. A Rowenta "Steamium" 1800 watt iron was used for this project.
.jpg) |
| Use the tape measure and follow along with the iron to ensure the spacing stays 8" on center of rib tapes |
Check the iron on rib tape edges to ensure a good solid seal. If there are problems, use a hot glue gun to touch up any gaps.
Allow the iron on ribs to cool for a few minutes and then slide the ribs into the slots that are created with the ribs to proceed to the next step of the fabrication process. Below is an image of the shade with all the ribs inserted into the iron on rib inserts. Cut the ribs 1" less than the width of finished shade. This will prevent any pulling or puckering on the front side finished shade edges.
Attaching the lift cord to the shade:
Ensure you are using the ANSI standards compliant shrouded lift cord to attach to the back of the shade for lifting and lowering the shade.
Next step is to cut and lay out your shrouded cord according to how many rows of lift you will use to put the shade up & down. Typically the tape is cut 4" to 5" longer than the length of the shade. Also, use the shade stops and tube clips as a guide for the placement of your shrouded tape onto the shade.
This ensures level and even lifting and lowering when using the Rollease clutch system.
 |
| For this shade the spacing provided for 5 rows of shroud lift tape on the lift system |
When attaching the shroud tape to the back of the shade, I use a dab of hot glue from a hot glue gun on each side of the shroud tape, making sure not to get any on the portion in the center that has the lift cord. Next, I use 6-8 pieces of thread on a needle and insert into the rib tapes where the heat activated glue portion is. 6-8 pieces of thread saves time because it only requires one insertion for each side of the shroud tape. Go through all the layers of the shade to the front side fabric. Stabbing the thread into the iron on rib tape pieces provides additional stability to the lift system. This is because of the rib tape glue and the additional thickness of the rib tape fabric and the ribs themselves are supporting the weight of the lift and being pulled instead of your fabrics and interlinings.
 |
| Use 6 to 8 threads to save time on how many times you poke through the fabric |
 |
Close up detail of the 6-8 threads coming up through the glued on rib tape cut off with 3" tails
|
 |
| Use 2 tails closest together to tie a double knot then re-thread into a needle and "hide" the ends into the shroud tape |
|
|
|
 |
| Press side seams into shade ensuring the width is correct from top to bottom using tape measure. |
Finishing Side Hems:
Next step is to press the side hems in using the iron. Pressing a firm crease into the side hem; ensure you have the same width from top to bottom using the tape measure across the width of the shade as you go similar to the iron on rib tape procedure shown above.
Using a heat activated sealer tape, hot glue gun or hand sewing, complete the side hems however you choose for a clean finish. When hand sewing in the side hems, I do not go all the way out to the face fabric as this causes a dimpling effect on the face of the shade.
 |
| Finished side hems |
|
|
|
Connecting the shade to the Lift System:
Next step is to line up the Rollease board mounted lift device to your shade and begin the process to connect your shade to the board and lift system. Use the shade stop tie on holes as a guideline for where your lift cords will be lined up. This provides ensured straight lifting of the shade when it is going up and down.
 |
| Rollease Lift System Tube clips and shade stops detail |
Using a hot glue gun to secure the knots on the shroud cord can be done after checking the lift system's lift ability.
Check the lift system to ensure proper operation:
I check for straight lift as well as even lift and the back of the shade shroud tape and cord to ensure no tangling of the cord in the tube clips is occurring.
Finishing the Shade Bottom
For the bottom edge of your shade, you can use the edge of the french blackout pieces as your guide. Press in with the steam iron the bottom crease that will be your edge on the bottom of the shade.
If you have several inches of fabric on this bottom edge, you will want to fold it over making a double fold. This is the space where your bottom weight rod will be placed.
Finishing the shade length
For the top portion, you will have to use your tape measure to ensure a completely even shade. You will want to measure the shade top to bottom at many points along the entire width of the shade for the best accuracy. Then using a chalk or disappearing pen, make a mark in the top where you will cut off any excess fabric. When the shade top is cut to the right size, I then go to the serger machine and serge this top edge for a clean look. Another way to give a clean look is use a 1" fold and press with the steam iron, staple this serged/folded edge down to the board.
I use a board that is 3 3/4" wide so I make the shade the exact length needed plus 3 1/2" extra length to wrap around the top of the board and staple. For a folded over edge add your board width minus 1/4" and then add an extra 1" for the fold.
 |
| The back of the shade when it is raised |
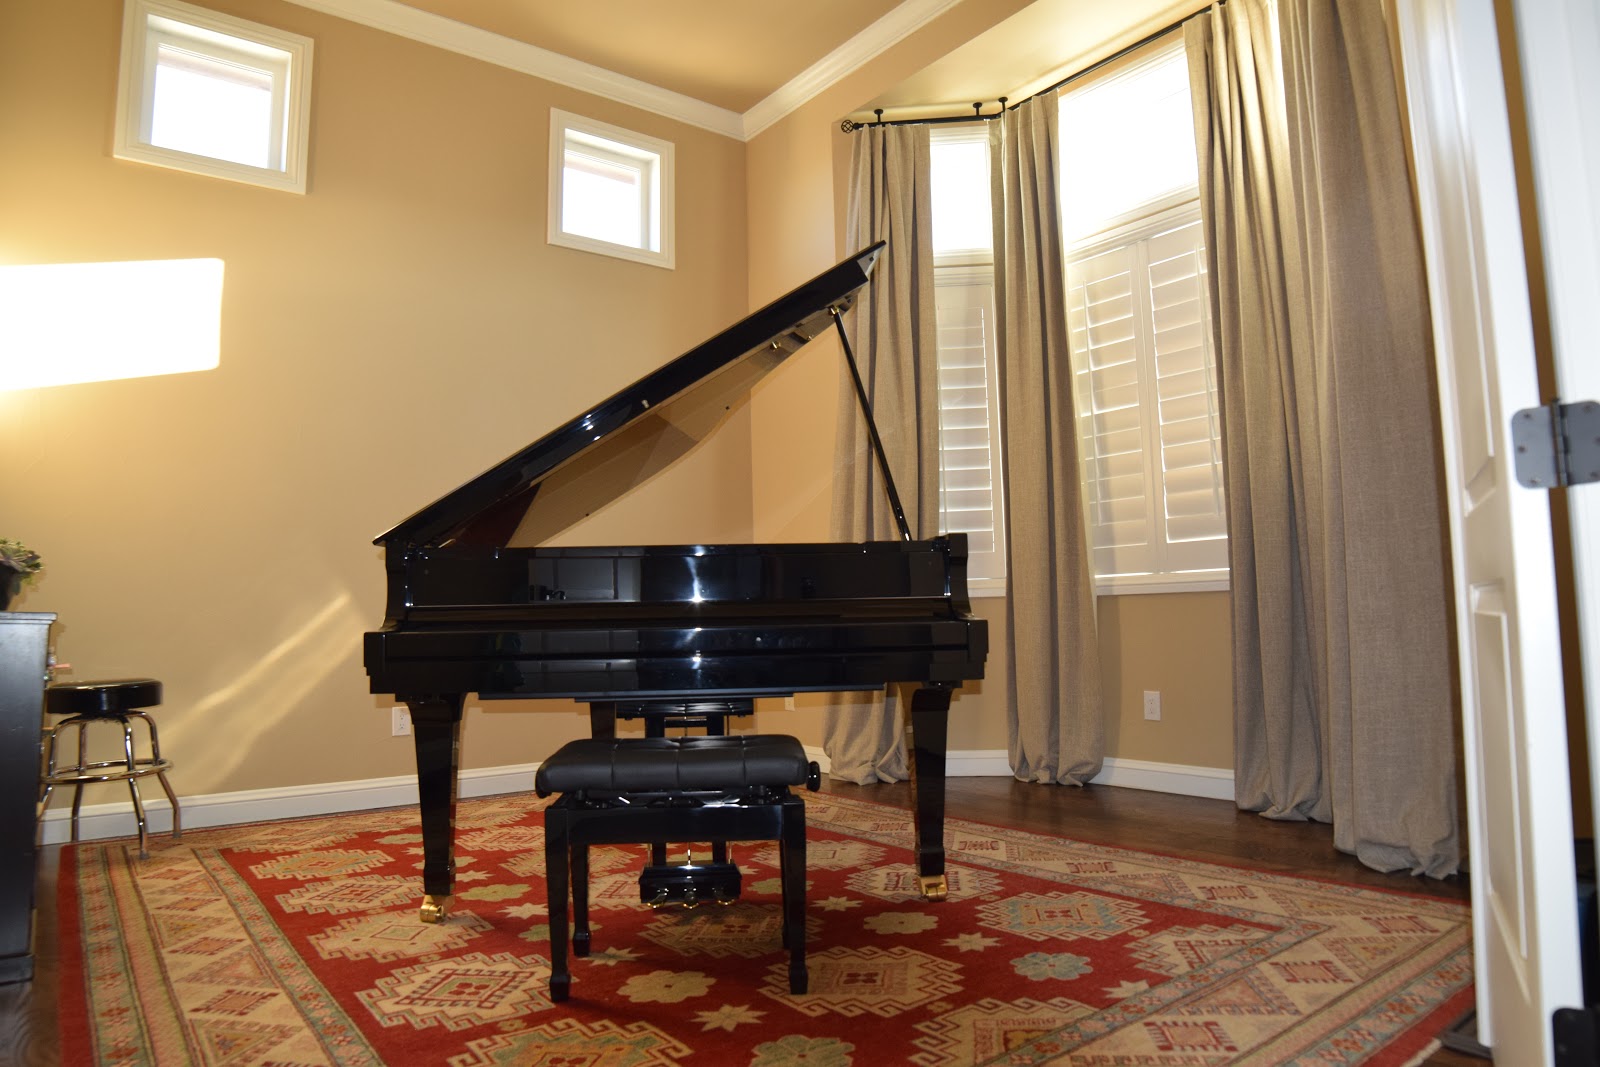
 |
| The front of the shade when it is raised |
The shade can be raised even higher and tighter, but I wanted to show the detail of the striped fabric and the banding at the bottom.
 |
| The front of the shade when it is raised |
 |
| The back of the shade when it is lowered |